
Route 53 Profiles - Everything you need to know
Dec 13, 2025Route 53 profiles were created to address one challenge - sharing Route 53 configurations like Private Hosted Zones (PHZs), Resolver Rules, DNS Firewall Rules etc. from a central account to 100s of spoke accounts.
You could still do this earlier but in a scattered approach for example:
1. To share a Private Hosted Zone created in Account A with Account B you need to use the AWS CLI commands in both accounts as follows:
(From Account A) aws route53 create-vpc-association-authorization --hosted-zone-id hosted-zone-id --vpc VPCRegion=region,VPCId=vpc-id --region us-east-1
(From Account B) aws route53 associate-vpc-with-hosted-zone --hosted-zone-id hosted-zone-id --vpc VPCRegion=region,VPCId=vpc-id --region us-east-1
2. To share a Resolver Rule or a DNS Firewall Rule Group or Resolver Query Logging configuration you need to share that resource via RAM and then associate that resource in the spoke account to the desired VPCs.
Limitations and issues:
1. Limits on sharing resources using the older traditional methods outlined in the above section for example you can only associate 300 VPCs to a PHZ
2. The shared PHZs don't appear anywhere in the spoke account GUI causing confusion while troubleshooting DNS resolution issues
Enter Route 53 Profiles:
With Route 53 profiles you can share the following resources with other AWS accounts in your environment:
1. R53 PHZs
2. R53 Resolver Rules
3. R53 DNS Firewall Rule Groups
4. R53 Resolver query logging configuration
5. Interface VPC Endpoints (most recent addition)
You can also control some R53 related VPC settings in the spoke accounts through these profiles:
1. Reverse DNS lookup configuration for Resolver Rules.
2. DNS Firewall failure mode configuration.
3. DNSSEC validation configuration.
Lets check out some examples:
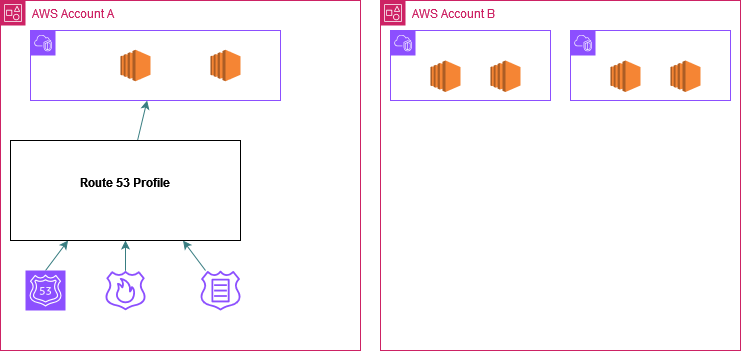
Example 1. Sharing PHZ, DNS Firewall Rule Group, Resolver Query Logging and R53 related VPC settings.
Account A has a PHZ, a DNS Firewall Rule Group and Resolver Query Logging configuration. The idea is to share these 3 resources and some Route53 related VPC Settings to 100s of AWS accounts in your environment.
Step 1: Create a R53 profile and associate these resources to the profile as shown below. You may need to disassociate the Firewall Rule Group and Resolver Rule from the local VPC A. You can then associate the Profile to the VPC thus applying the Firewall Rule Group and the Resolver Rule to the VPC. For the PHZ you can let it be associated to the VPC and also associate it to the profile.
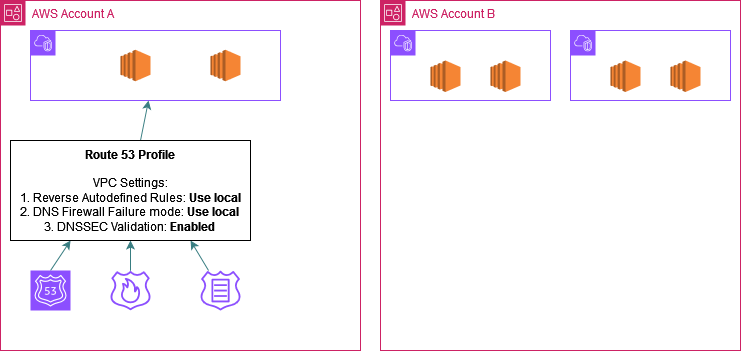
Step 2: Set the R53 related VPC settings in the profile:
a. Reverse DNS lookup configuration for Resolver Rules.
b. DNS Firewall failure mode configuration.
c. DNSSEC validation configuration.
You can choose to enable or disable or use the local configuration of the spoke VPC which is the default option. In this example I have enabled DNSSEC Validation and kept the other 2 at the default option. When this profile is associated to a prospective VPC in a spoke account, DNSSEC validation will be enabled for that VPC while the VPC will retain its own setting for the other 2 settings.
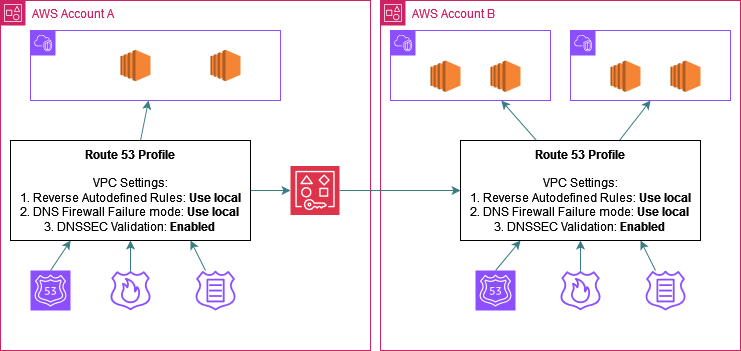
Step 3: Share the profile using RAM with all the spoke accounts:
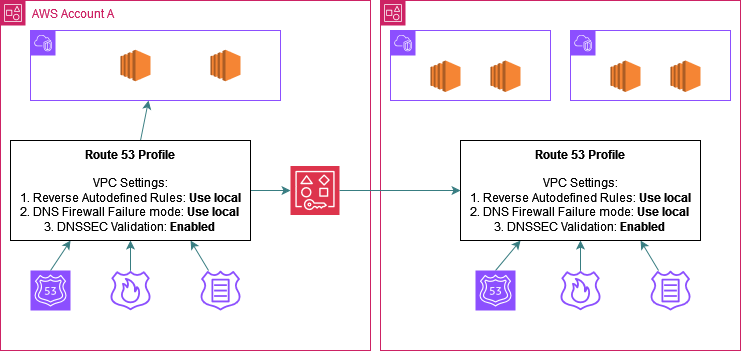
Step 4: The profile starts appearing in the spoke accounts Route53 console (depends on if the account is part of Org or not - more on this in Sharing Route53 Profiles section towards the end of the article). In each spoke account go ahead and associate the profile to the desired VPCs which need to leverage the shared resources.
Example 2. Sharing Resolver Rules:
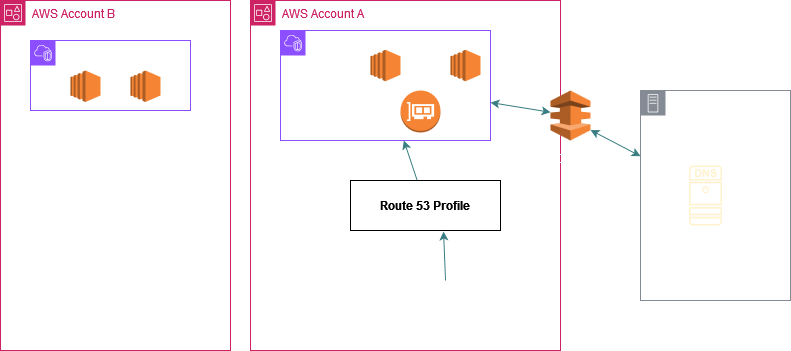
Account A has a R53 Outbound Endpoint deployed in VPC A and a Forward Resolver Rule defined to send DNS queries for the domain onprem.com originating in the VPC to an onprem DNS Server. We can share this rule with other accounts using R53 profiles
Step 1: Create a R53 profile and associate the Resolver Rule to the profile. You may need to detach the rule from the VPC first.
Step 2: Share the profile using RAM with all the spoke accounts
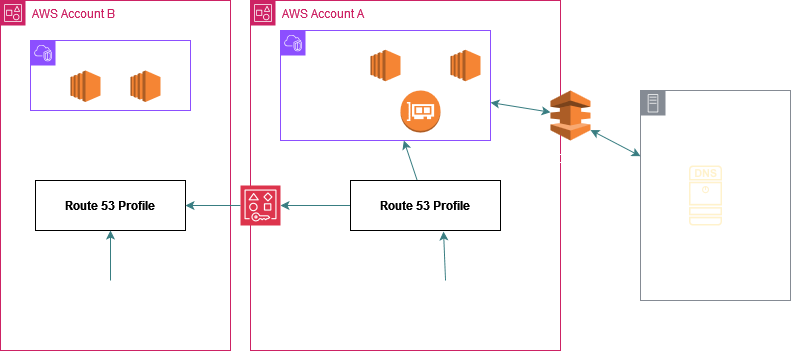
Step 3: The profile starts appearing in the spoke accounts Route53 console (depends on if the account is part of Org or not - more on this in Sharing Route53 Profiles section towards the end of the article). In each spoke account go ahead and associate the profile to the desired VPCs which need to leverage the shared Resolver Rule.
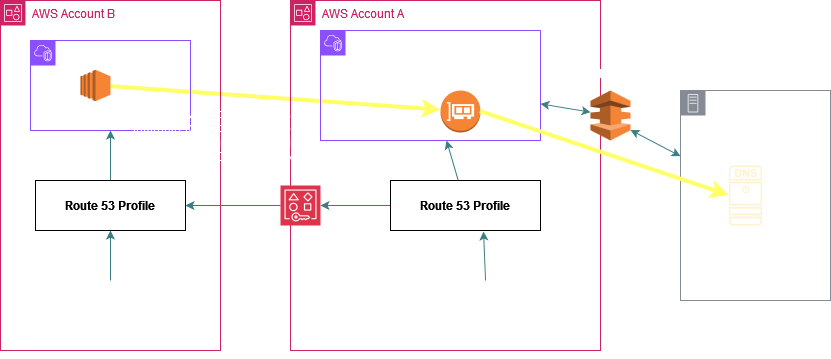
Imp Note: In case of Resolver Rule sharing, no connectivity is required between VPC A and the VPCs in the spoke accounts. The DNS queries originating in the spoke VPCs and hitting the local VPC DNS server (.2) are internally sent to the Outbound Endpoint in VPC A and are then further sent to the onprem target DNS server using the connectivity setup between VPC A and the onprem network (Direct Connect in this example). Again the key point is there is no connectivity configured between VPC A and any of the spoke VPCs.
Example 3. Sharing Interface VPC Endpoints:
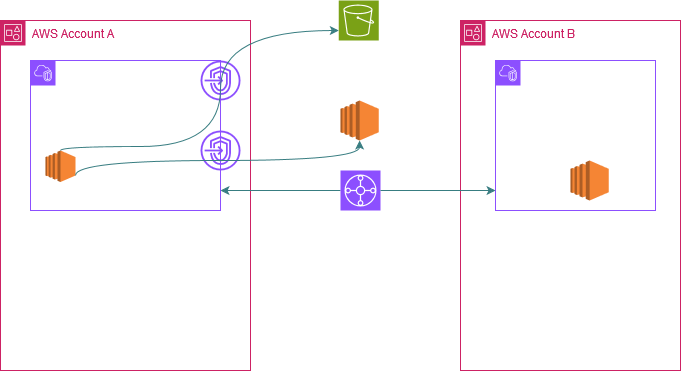
Account A has S3 and EC2 Interface VPC Endpoints deployed in VPC A with Private DNS Setting enabled (This setting should be enabled otherwise it won't let you associate the endpoint to the Route 53 profile.) This means that resources in this VPC can access the S3 and EC2 service endpoints i.e s3.<region>.amazonaws.com and ec2.<region>.amazonaws.com using the Interface VPC Endpoint's private IP.
The way this is achieved internally is that the service creates a PHZ behind the scenes for these DNS names and associates the PHZ to the VPC. You can only see the DNS name and the hosted zone id in your console but you cannot see the PHZ itself. Inside that PHZ the service creates DNS records mapping these DNS names to the Interface VPC Endpoints private IPs.
Now to leverage these endpoints from other VPCs without R53 profiles you could create PHZs called s3.<region>.amazonaws.com and ec2.<region>.amazonaws.com and associate them to the spoke VPC. In the PHZ you could then create DNS records like this:s3.<region>.amazonaws.com CNAME vpce-xxxx-xxxx.s3.<region>.vpce.amazonaws.com
ec2.<region>.amazonaws.com CNAME vpce-xxxx-xxxx.ec2.<region>.vpce.amazonaws.com
Or you could also create R53 Inbound Endpoint, R53 Outbound Endpoint and Resolver Rules in VPC A and share the rules with the spoke VPCs as per the above picture to bring the DNS queries for these 2 DNS names to VPC A's VPC DNS Server (.2) through the R53 Inbound Resolver Endpoint.
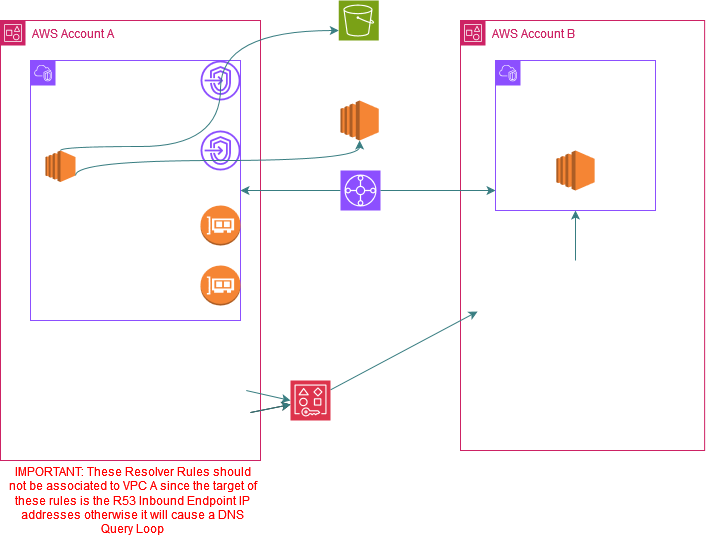
But with R53 profiles you don't have to go through this pain.
Step 1: Create a R53 profile and associate the Interface VPC Endpoints to the profile
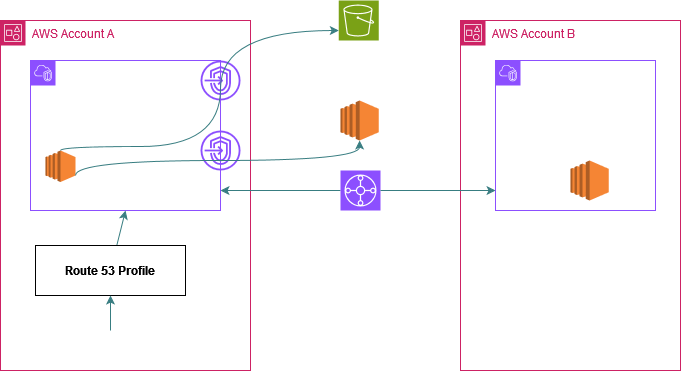
Step 2: Share the profile using RAM with all the spoke accounts.
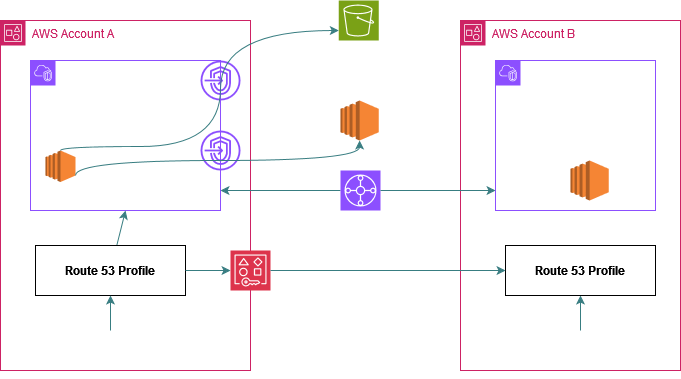
Step 3: The profile starts appearing in the spoke accounts Route53 console (depends on if the account is part of Org or not - more on this in Sharing Route53 Profiles section towards the end of the article). In each spoke account go ahead and associate the profile to the desired VPCs which need to leverage the shared Interface Endpoints.
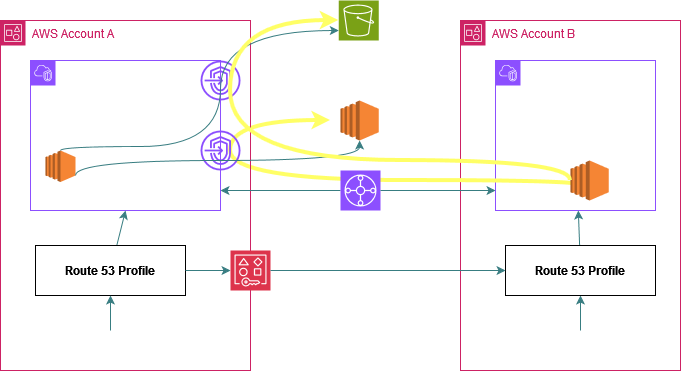
The DNS queries from the spoke VPC for these services i.e s3.<region>.amazonaws.com and ec2.<region>.amazonaws.com now automatically start resolving to the same Interface Endpoints private IPs. Each spoke account should have connectivity to VPC A so that traffic from the spoke VPCs destined to the Interface Endpoints IPs of VPC A can reach those IPs as depicted in this picture below through the TGW.
P.S. I just used different examples for clarity - you can share all of these resources and R53 related settings using 1 R53 profile.
Sharing Route53 Profiles - Fine points and advance capabilities:
- To share a profile using RAM you must own it in your AWS account. This means that the resource must be allocated or provisioned in your account. You cannot share a Route 53 Profile that has been shared with you.
- To share a Route 53 Profile with your organization or an organizational unit in AWS Organizations, you must enable sharing with AWS Organizations.
- If you are part of an organization in AWS Organizations and sharing within your organization is enabled, consumers in your organization are automatically granted access to the shared Route 53 Profile. Otherwise, consumers receive an invitation to join the resource share and are granted access to the shared Route 53 Profile after accepting the invitation.
Once you share resources from a central account to spoke accounts, you can also add independent resources from those spoke accounts to the profile thus letting the spoke account share its own R53 resources to all the other accounts/VPCs associated to the profile including the central account.
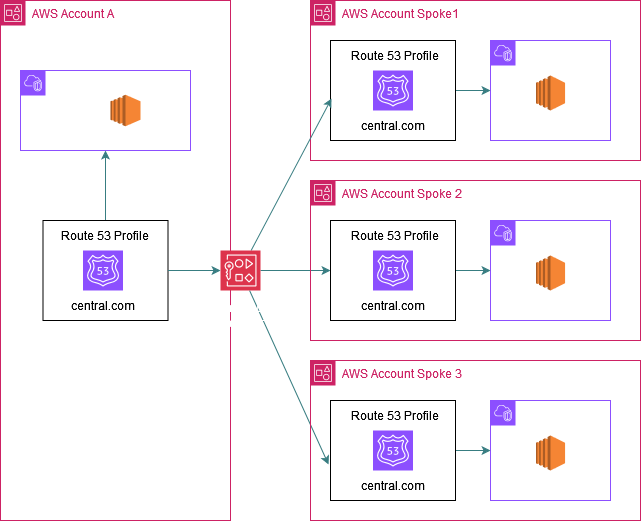
In the below picture the central Account A shares a PHZ (central.com) with 3 spoke accounts using R53 profiles:
Now spoke Account 1 also has its own PHZ (spoke1.com) which it wants to share with all other accounts and so once the profile is shared using RAM with this spoke account it can also associate its own PHZ (spoke1.com) to the profile.
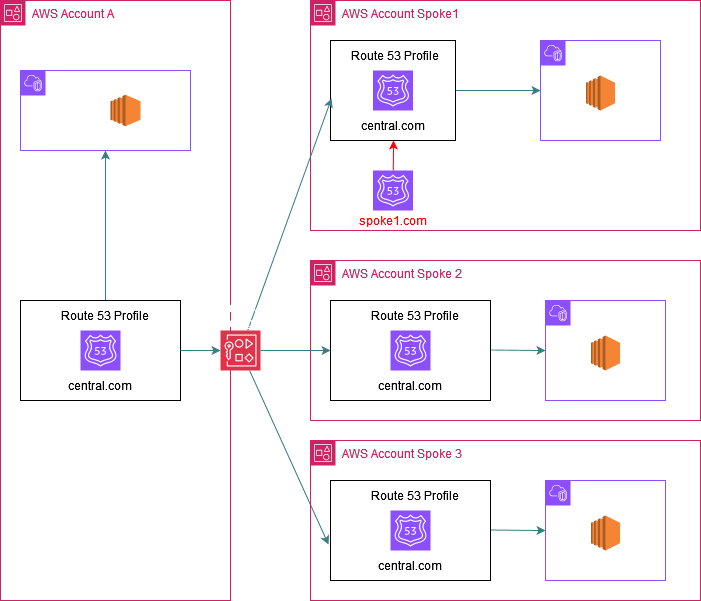
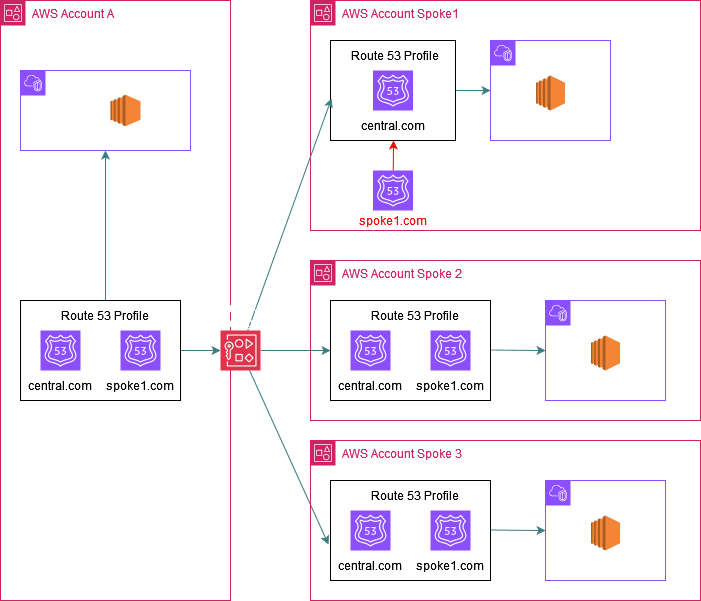
The result is that all the VPCs associated to this profile (i.e central account VPC and also spoke 2 and 3 VPCs) now get access to spoke1.com.
In order to achieve this you need to add 1 extra step while sharing the profile using RAM: Create a custom Managed Permission.
The default one as shown below only allows the spoke accounts to associate the profile to their VPCs. It won't let them add any of their resources to the profile.
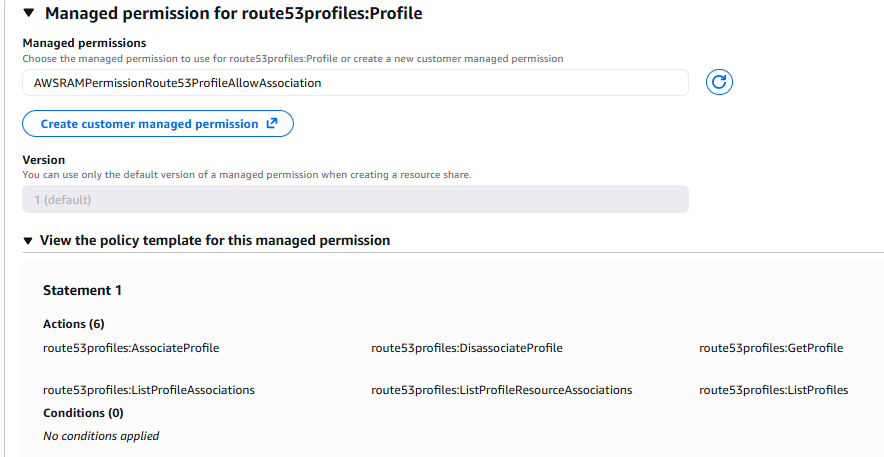
Click on "Create customer managed permissions" in the above screenshot, give it any name you like, select route53profiles:Profile from the dropdown and then add the extra highlighted permissions below on top of the the default ones to let the spoke accounts add their own resources they would like to share to the profile that was shared with them.
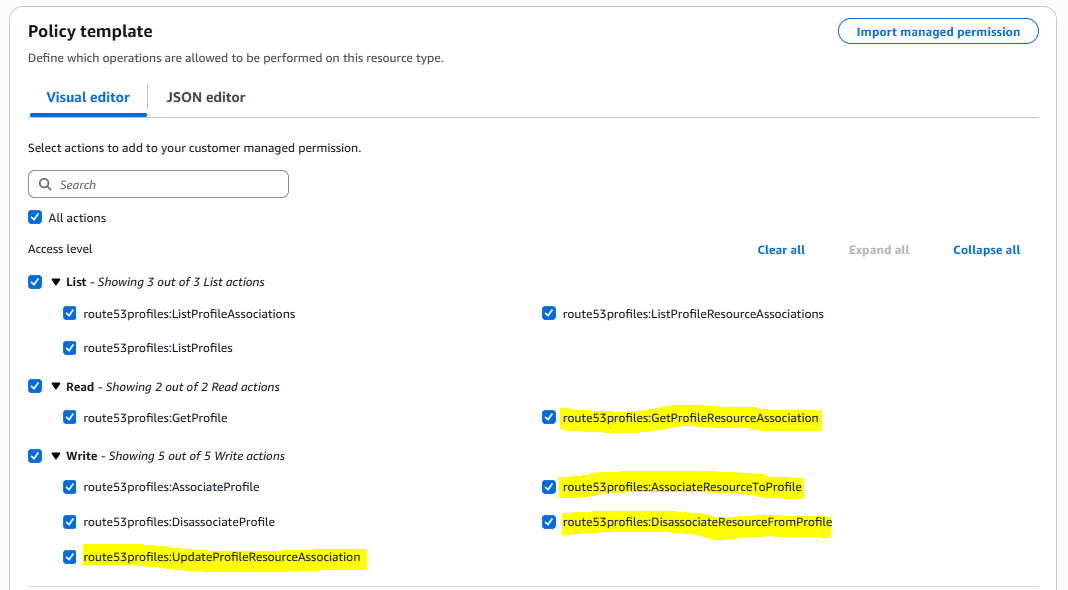
Once the custom permission is created, continue creating the resource share by refreshing the permission dropdown and selecting the newly created custom permission.
In summary Route53 Profiles offer a streamlined approach for sharing Route 53 configurations like Private Hosted Zones, DNS Firewall Rules, Resolver Rules, VPC Endpoints, Resolver query logging configuration and VPC Settings related to Route 53 in 1 shot between AWS Accounts instead of sharing these constructs individually thus reducing admin overhead. Don't forget to check out the Quotas on Route 53 Profiles. That's all!
